前端工程化概述
Season Chen
2016-12-14
很久以前
页面是这样的, 大多数用table布局,html、样式、脚本混合在一起。
<table width="100%" cellpadding="0" cellspacing="0" style="font-family: 'Helvetica Neue',Helvetica,Arial,sans-serif; box-sizing: border-box; font-size: 14px; margin: 0;">
  <tr style="font-family: 'Helvetica Neue',Helvetica,Arial,sans-serif; box-sizing: border-box; font-size: 14px; margin: 0;">
    <td class="content-block" style="font-family: 'Helvetica Neue',Helvetica,Arial,sans-serif; box-sizing: border-box; font-size: 14px; vertical-align: top; margin: 0; padding: 0 0 20px;" valign="top">
      You have <strong style="font-family: 'Helvetica Neue',Helvetica,Arial,sans-serif; box-sizing: border-box; font-size: 14px; margin: 0;">1 free report</strong> remaining.
    </td>
  </tr>
  <tr style="font-family: 'Helvetica Neue',Helvetica,Arial,sans-serif; box-sizing: border-box; font-size: 14px; margin: 0;">
    <td class="content-block" style="font-family: 'Helvetica Neue',Helvetica,Arial,sans-serif; box-sizing: border-box; font-size: 14px; vertical-align: top; margin: 0; padding: 0 0 20px;" valign="top">
      Add your credit card now to upgrade your account to a premium plan to ensure you don't miss out on any reports.
    </td>
  </tr>
  <tr style="font-family: 'Helvetica Neue',Helvetica,Arial,sans-serif; box-sizing: border-box; font-size: 14px; margin: 0;">
    <td class="content-block" style="font-family: 'Helvetica Neue',Helvetica,Arial,sans-serif; box-sizing: border-box; font-size: 14px; vertical-align: top; margin: 0; padding: 0 0 20px;" valign="top">
      <a href="http://www.mailgun.com" class="btn-primary" style="font-family: 'Helvetica Neue',Helvetica,Arial,sans-serif; box-sizing: border-box; font-size: 14px; color: #FFF; text-decoration: none; line-height: 2em; font-weight: bold; text-align: center; cursor: pointer; display: inline-block; border-radius: 5px; text-transform: capitalize; background-color: #348eda; margin: 0; border-color: #348eda; border-style: solid; border-width: 10px 20px;">Upgrade my account</a>
    </td>
  </tr>
  <tr style="font-family: 'Helvetica Neue',Helvetica,Arial,sans-serif; box-sizing: border-box; font-size: 14px; margin: 0;">
    <td class="content-block" style="font-family: 'Helvetica Neue',Helvetica,Arial,sans-serif; box-sizing: border-box; font-size: 14px; vertical-align: top; margin: 0; padding: 0 0 20px;" valign="top" onclick="alert('hello word!')">
      Thanks for choosing Acme Inc.
    </td>
  </tr>
</table>
之后
出现了结构、表现和行为分离,出现了独立的css(层叠样式表)文件和独立的js文件, 流行div布局。
这样:
<style>
.test{
  font-size: 20px;
}
</style>

<div class="test">
  hello word !
</div>

<script>
  alert('hellow word !');
</script>
或者这样:
<link rel="stylesheet" href="./common.css">
<link rel="stylesheet" href="./a.css">
<link rel="stylesheet" href="./b.css">
<link rel="stylesheet" href="./c.css">
<link rel="stylesheet" href="./test.css">

<div class="test">
  hello word !
</div>

<script src="./common.js"></script>
<script src="./a.js"></script>
<script src="./b.js"></script>
<script src="./c.js"></script>
<script src="./test.js"></script>
再之后
项目越来越大,就出现一些需要解决的问题:
- 项目越来越大了,业务逻辑越来越复杂
- 文件体积越来越大了,抢占网络带宽
- 文件数量越来越多,服务器压力增大
- css、js的干扰、冲突增多,维护苦难
- 小图标大量使用
- js语言特性,很难写出统一规范的代码
- 大文件如何拆分,代码如何重用
- 资源如何能按需加载
- 资源打包
- 资源压缩
- 资源之间的依赖关系
- 资源路径的灵活配置(CDN等)
为了解决上述问题,以下简单地从各个几方面来分别阐述
JS模块化
解决代码重用的问题
- CommonJS规范
- AMD规范
- CMD规范
- UMD规范
CommonJS规范
nodejs环境使用的模块规范,CommonJS定义的模块分为:{模块引用(require)} {模块定义(exports)} {模块标识(module)}。 require()用来引入外部模块;exports对象用于导出当前模块的方法或变量,唯一的导出口;module对象就代表模块本身。
// test.js
module.exports = function() {
  //
}

//main.js

var test = require('test');
test();
AMD(异步模块定义)规范
AMD是"Asynchronous Module Definition"的缩写,意思就是"异步模块定义"。它采用异步方式加载模块,模块的加载不影响它后面语句的运行。所有依赖这个模块的语句,都定义在一个回调函数中,等到加载完成之后,这个回调函数才会运行。
RequireJS 在推广过程中对模块定义的规范化产出
- define(id?, dependencies?, factory);
- require(dependencies, callback);
// 模块c定义
define(['../a', '../b'], function(require, exports, module){
  var a = require('a'),
    b = require('b');

  exports.action = function(){};
});

// 模块c调用
require(['../c'], function(m) {
  m.action();
});
CMD规范
CMD 是 SeaJS 在推广过程中对模块定义的规范化产出。
- seajs.use
- define
- require
UMD规范
UMD是AMD和CommonJS的糅合, 同时支持在node环境和浏览器环境中运行。UMD先判断是否支持Node.js的模块(exports)是否存在,存在则使用Node.js模块模式。在判断是否支持AMD(define是否存在),存在则使用AMD方式加载模块。
(function (window, factory) {
     if (typeof exports === 'object') {
          module.exports = factory();
     } else if (typeof define === 'function' && define.amd) {
          define(factory);
     } else {
          window.eventUtil = factory();
     }
})(this, function () {
     // module ...
});
js模板引擎(输入数据,输出html)
为什么需要模板引擎
平常不用模板引擎,生成html片段的做法:
html = '<!doctype html>';
html += '<html>';
html += '<head>';
html += '<title>' + pathname + '</title>';
html += '</head>';
html += '<body>';
html += '<h1> - ' + pathname + '</h1>';
html += '<div id="file-list">';
html += '<ul>';

if (pathname != '/') {
  html += '<li><a href="' + pathname + '..">..</a></li>';
}

files
  .forEach(function(item) {
    var s_url = path.join(pathname, item);
    html += '<li><a href="' + s_url + '">' + item + '</a></li>';
  });

html += '</ul>';
html += '</div>';
html += '</body>';
html += '</html>';
使用模板引擎:
var template = `
  <ul>
  <% for(var i=0; i<supplies.length; i++) {%>
     <li><%= supplies[i] %></li>
  <% } %>
  </ul>
`;

var data = {};
var html = ejs.render(template, data)- baiduTemplate(百度)
- artTemplate(腾讯)
- juicer(淘宝)
- ejs
- ...
各模板测试数据

ejs模板引擎示例
<ul>
<% for(var i=0; i<supplies.length; i++) {%>
   <li><%= supplies[i] %></li>
<% } %>
</ul>
ejs.render(template, data);css sprites
网站中一个小图标对应一张小图片,一个网站可能会有几十到几百个小图片,打开就会产生几十到几百个请求。
为了减小网络压力,需要将多个小图标图片合并为一张大图片,然后通过css设置背景的不同位置的方式给小图标展示出来,这就是CSS Sprites;
- 手动合并
- 工具合并, 图片自动合并,css自动更新
.icon-a,
.icon-b,
.icon-c {
  background-image: url('../sprites.png');
}
.icon-a {
  background-position: 10px 20px;
}
.icon-b {
  background-position: 30px 20px;
}
.icon-c {
  background-position: 50px 20px;
}
IconFont
将图标做成字体,通过字体定义的Unicode编码引用。
优点:
- 维护起来比css sprites方便
- 体积比图片更小
- 矢量, 可以自定义大小和颜色
- 支持一些css3对文字的效果,例如:阴影、旋转、透明度
缺点:
- 单色
- 毛边
工具网站
SVG Sprites
将多个svg小图标合并成一个大的svg,在页面中引入这个大的svg,然后在图标出通过id引用其中的图片节点。
目前,SVG Sprite最佳实践是使用symbol元素。
symbol元素是什么呢?单纯翻译的话,是“符号”的意思。然,这个释义并不符合这里的场景。不知大家有没有用过Flash,symbol实际上就类似于Flash中的“影片剪辑”、或者“元件”。
<svg xmlns="http://www.w3.org/2000/svg" style="width:0;height:0;visibility:hidden;">
  <symbol viewBox="0 0 1024 1024" id="iconfont-baobei">
    <title>iconfont-baobei</title>
    <path fill="#272636" d="M...z" transform="translate(0, 800) scale(1, -1)"/>
  </symbol>
  <symbol viewBox="0 0 1024 1024" id="iconfont-bianji">
    <title>iconfont-bianji</title>
    <path fill="#272636" d="M...z" transform="translate(0, 800) scale(1, -1)"/>
  </symbol>
  <symbol viewBox="0 0 1024 1024" id="iconfont-shangchuan">
    <title>iconfont-shangchuan</title>
    <path fill="#272636" d="M...z" transform="translate(0, 800) scale(1, -1)"/>
  </symbol>
</svg>

<svg>
  <use xlink:href="#iconfont-baobei"></use>
</svg>
<svg>
  <use xlink:href="#iconfont-bianji"></use>
</svg>
<svg>
  <use xlink:href="#iconfont-shangchuan"></use>
</svg>
优点:
- 质量更好,不会产生毛边
- 可以设置渐变色,动画
缺点:
- 兼容性
工具:
CSS解决方案
BEM 命名规范
BEM的意思就是块(block)、元素(element)、修饰符(modifier)。
.block{}
.block__element{}
.block--modifier{}
css moudles
import React from 'react';
import style from './App.css';

export default () => {
  return (
    <h1 className={style.title}>
      Hello World
    </h1>
  );
};
缺点:
- 必须在js内部使用,合js耦合性太高
- 代码太过零散,你不清楚那个js文件调用了哪个css,改一个样式可能牵一发动全身,维护困难
- 可能会输出很多重复的样式
css scoped
<div class="democontain lazy ">

    <style scoped>
        div { border: 1px solid green; margin-bottom: 20px; min-height: 40px; }
        .democontain { background: #f8f8f8; }
    </style>

    <div></div>
    <div style="border-color: pink;">

        <style scoped>
            div { background: lightblue; border: 1px solid blue; }
        </style>

        <div></div>
    </div>
    <div></div>
</div>
缺点:
- 必须写在html对应的结构处,不变维护
变种的 css scope
通过工具,将一个独立的js文件和对应的css选择器,都加上一个唯一的标志,达到css scoped的目的。
<style>
.test[_xdfdfdf] {
  //
}
</style>
<div class="test" _xdfdfdf>
  <a href=""></a>
</div>
期待的css解决方案
- 基于BEM模式的扩展
- 利用LESS、SCSS的一些高级特性,生成BEM选择器
- 利用工具和相应的规范,自动转换html中的选择器
预编译
js预编译语言
更简洁的代码,更规范、更严格的语法规范。
- CoffeeScript
- typescript
# 对象:
math =
  root:   Math.sqrt
  square: square
  cube:   (x) -> x * square x

# Splats:
race = (winner, runners...) ->
  print winner, runners

# 存在性:
alert "I knew it!" if elvis?

# 数组 推导(comprehensions):
cubes = (math.cube num for num in list)
HTML预编译
- Pug(Jade)
doctype html
html(lang="en")
  head
    title= pageTitle
    script(type='text/javascript').
      if (foo) bar(1 + 5)
  body
    h1 Pug - node template engine
    #container.col
      if youAreUsingPug
        p You are amazing
      else
        p Get on it!
      p.
        Pug is a terse and simple templating language with a
        strong focus on performance and powerful features.
css预编译
为什么要css预编译语言?
- 变量
- 方法
- 逻辑控制
- 代码重用
- 等等...
常用css预编译语言
- SASS,SCSS
- LESS
- Stylus
.class1{
  font-size:19px;
  b {
    //
  }
}
.class2{
  @extend .class1;
  color:black;
}
.class1{
  font-weight:bold;
}
前端模式
MVC
MVC是一种设计模式,它将应用划分为3个部分:数据(模型)、展现层(视图)和用户交互(控制器)。
- 模型(M):数据管理
- 视图(V):展现效果
- 控制器(A):定义交互动作
 .
.
 .
.
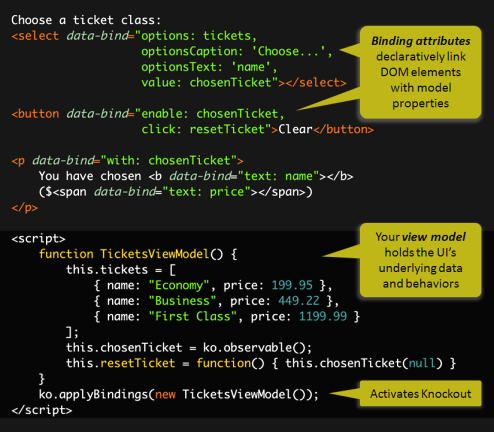
MVVM
双向绑定
- KnockOutJS
- AngularJS
- Vue.js

前端组件化
何为组件?
- 重用
- 独立
- 标准的输入输出(如viedo标签)
- 独立的(css + html + js), 以及 (props + events)
<video src="movie.ogg" controls="controls">
  您的浏览器不支持 video 标签。
</video>
React 组件
require('test.css');

React.createClass({
  protoTypes: {
    isOpen: PropTypes.bool.isRequired,
    hubs: PropTypes.array.isRequired,
    onClose: PropTypes.func.isRequired,
    type: PropTypes.array.string,
    className: PropTypes.string,

    callback: protoTypes.function,
  },
  render() {
    return (
      <div className="test" @click={this.props.callback}>
        //
      </div>
    );
  }
});
vue.js 单文件组件
<!-- vue 组件 -->
<template>
  <div>
    <span>hello word!</span>
  </div>
</template>

<script>
  export default {
    props: {
      visible: Boolean,
    },
    data() {
      return  {

      }
    }
  }
</script>

<style>
  div {
    //
  }
</style>
ShadowDOM
Shadow DOM是指浏览器的一种能力,它允许在文档(document)渲染时插入一棵DOM元素子树,但是这棵子树不在主DOM树中。
包管理
npm
Node Package Manager, nodejs的包管理器, 一般随nodejs一起安装。
- package.json
- node_modules
npm installbower
A package manager for the web, 依赖于npm,主要作为前端包的管理。
- bower.json
- bower_components
bower install构建工具
grunt
JavaScript 世界的构建工具, 老牌的构建工具
gulp
基于文件流(pipe)的构建工具。
// gulpfile.js
var gulp = require('gulp');

gulp.task('default', function() {
  // 将你的默认的任务代码放在这
});
build:
$ gulpwebpack
webpack is a module bundler, webpack takes modules with dependencies and generates static assets representing those modules.
// webpack.conf.js
module.exports = {
  entry: "./entry.js",
  output: {
      path: __dirname,
      filename: "bundle.js"
  },
  module: {
      loaders: [
          { test: /\.css$/, loader: "style!css" }
      ]
  }
};
build:
$ webpackFIS3
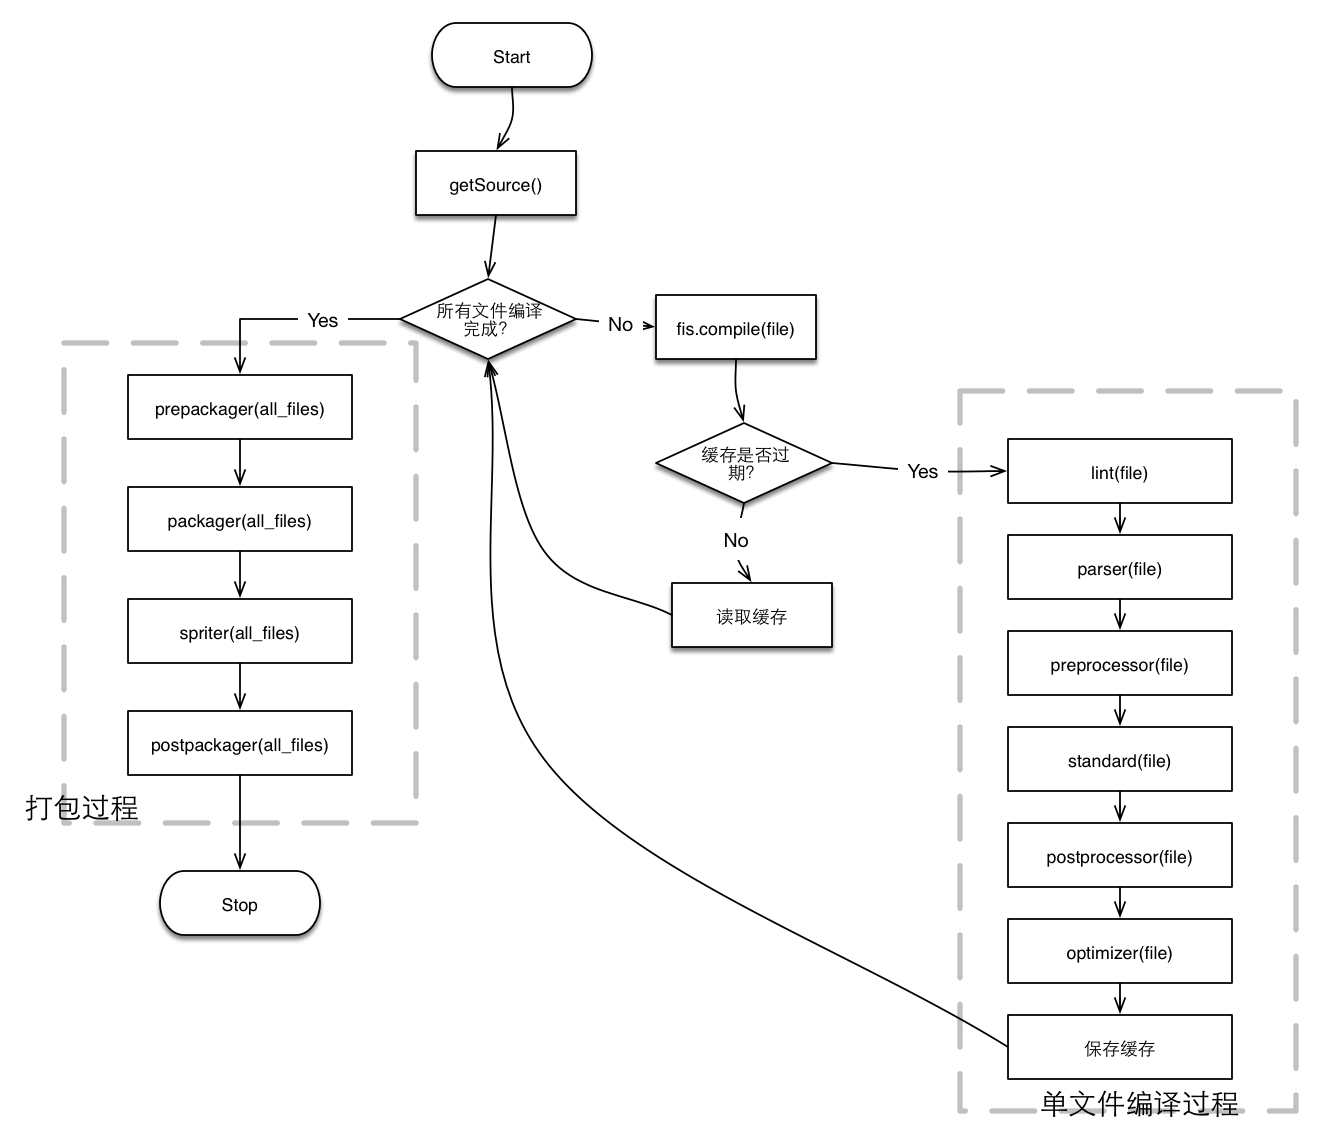
FIS3 , 为你定制的前端工程构建工具, 解决前端开发中自动化工具、性能优化、模块化框架、开发规范、代码部署、开发流程等问题。

// fis-conf.js
// test: 测试环境
['ut', 'it', 'uat'].forEach(function(env) {
  fis
    .media(env)
    .match('{src,src-static}/**.{html,js,jsx}', {
      preprocessor: fis.plugin('define', {
        defines: config[env].feDefine || {}
      }, 'prepend')
    })
    .match('**.{js,jsx,css,less,svg,ttf,eot,woff,po,vue,vue:less}', {useHash: true})
    .match('src/demo/(**)', {release: false})
    .match('*.{js,jsx,po,vue}', {
      optimizer: fis.plugin('uglify-js')
    })
    .match('*.{css,less,styl,vue:less}', {
      optimizer: fis.plugin('clean-css')
    })
    .match('::package', {
      packager: fis.plugin('deps-pack', {
        'pkg/src/pack/npm.js': [
          '/src/pack/npm.js:deps',
        ]
      }),
      postpackager: fis.plugin('loader', {
        allInOne: true
      }),
    })
    .match('**', {
      deploy: fis.plugin('local-deliver', {
        to: path.join(__dirname, './public/')
      })
    });
});
build:
$ fis3 release ut -w -crolup(Three-shaking)
the next-generation JavaScript module bundler. Three-shaking 的关键在于依赖 ES6 模块的静态结构。
// rollup.config.js
import json from 'rollup-plugin-json';

export default {
  entry: 'src/main.js',
  format: 'cjs',
  plugins: [ json() ],
  dest: 'bundle.js'
};
build:
rollup